
|
DoorStop X Firewall User's Guide User-defined Services |
 |
|
|
DoorStop X Firewall User's Guide User-defined Services |
|
The setup window
When you launch DoorStop X, the Setup window will appear, as shown below in Figure 1.
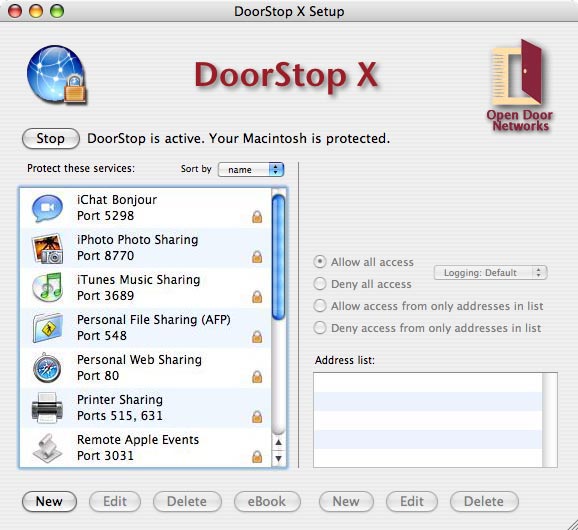
Figure 1. Setup window
At the top of the left pane of the Setup window is the Start/Stop button which turns DoorStop's service protection on and off. Below the Start/Stop button is a list of Internet services. When a service is selected from the list in the left pane, that service's protection is displayed in the right pane. The services list initially includes only the Internet services built into Mac OS X (for which protection will probably be desired). If you wish to protect a service not in the initial list, you must add the service to the list, as described in "Creating a new service entry" below. Services not displayed explicitly in the services list are protected using the settings for the "All Others" service entry, which for maximum security should be set to deny all access to all services not shown in the list.
To create a new service entry, click the New button under the list of services in the left-hand pane of the Setup window. The Service Information dialog appears as shown below in Figure 2, listing most known Macintosh Internet Services. The list will include entries for various organization-wide servers (like OS X Server) if the "Include server ports in list" checkbox is checked, and will include UDP-specific ports (6, Port Numbers) if UDP protection (6, Protocols) is enabled. The list is sorted by service name by default, but can be sorted by port number by clicking the Port column header.
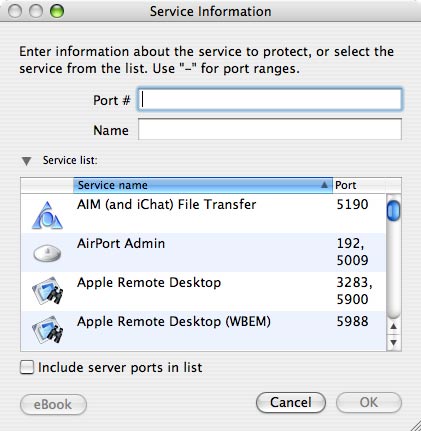
Figure 2. Service Information dialog
Choose a service from the list, or enter the service's port number (6, Port Numbers) and name directly. Power users may wish to hide the list by clicking the disclosure triangle to the left of "Service list:". If the service in question uses a range of ports, specify the range using "-", as in "100-105" for all ports between 100 and 105 inclusive. If the service uses multiple non-contiguous ports or ranges, separate each with a "," as in "100-105,109,112-115". If a service does not appear in the service list, or is using non-default ports, you must know the ports for the service. A list of common port numbers is available on Open Door's Web site.
When you have selected or manually entered a service, click OK. The new service appears highlighted in the Setup window's services list, and has a default setting of "Deny all access". If you wish to use another security setting for the new service, use the radio buttons in the right pane of the Setup window, as described in Protecting a service. If necessary, add addresses, as described in Adding an address to a service's address list.
Note: The "All Others" service entry protects all services which do not have explicit entries in the Setup window's service list. For maximum security, it is recommended that the "All Others" service entry be set to "Deny all access", and that access be granted only to those services requiring it.
Duplicating service entries
If you want to create a new service entry that uses the same set of addresses for its protection as an existing entry, you can do so by duplicating the existing entry. For example, let's say you created an entry for Retrospect (port 497), specified "Allow only from these addresses", and listed two subnets -- one for work and one for home. If you now wanted to create a service entry for FileMaker Pro (port 5003) that specified the exact same protection -- "Allow only from these addresses", listing the same two subnets -- you could select the Retrospect entry in the service list of the Setup window, and choose Duplicate from the Edit command. This brings up the Service Information list, from which you would choose FileMaker Pro and then click OK. An entry is created for FileMaker Pro that defines protection identical to that for Retrospect.
Editing & deleting protected service entries
Both built-in and user-defined service entries, described in the above sections, can be edited by selecting the entry in the Setup window's services list and clicking Edit, or by double-clicking the entry. The Service Information dialog appears as shown above in Figure 2.
A service entry can be deleted by selecting the entry from the Setup window's services list and clicking Delete.
Custom icons
For user-defined services that are not in DoorStop's list of known services, you can use a custom icon rather than the default "Unknown" icon. To do this:
Note: This only works for custom services NOT in DoorStop's list of services, as displayed in the Service Information window. If you have pasted in one image and wish to paste in a different one, you must delete the first image and then paste in the new one.
Further information about a service
Additional information on the service, and important contextual details, are often available in Internet Security for Your Macintosh and iPhone. Select an item in the Service Information dialog (Figure 2), and then click the "eBook" button at the bottom of the window. Your default browser will display the relevant entries in the book. See Figure 3.
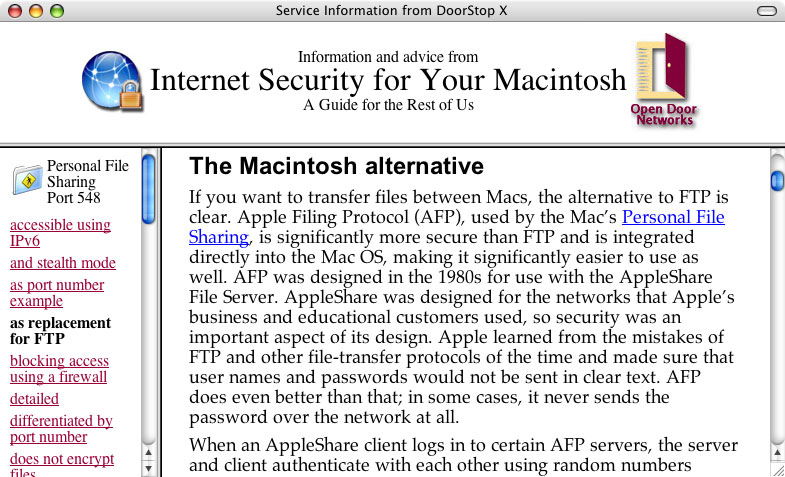
Figure 3. eBook entries on port 548
A list of relevant passages is displayed on the left, with the text of passages displayed on the right. If there is nothing in the book that corresponds to a service, you'll see a list of passages that relate to unknown services. You can also search the book's blog (isfym.com) and Top 10 list for current information on the service. Or visit our Twitter stream for the most up-to-date news.
![]() Back to Table of Contents
Back to Table of Contents
![]() Back to Protecting Basic Services
Back to Protecting Basic Services
![]() Forward to Configuration Tips
Forward to Configuration Tips